Showing posts with label Kitchen Appliance Organization. Show all posts

Friday, July 6, 2012

My IKEA Kitchen


When I moved into my apartment (7 years ago!), I immediately got to work on kitchen solutions.  I knew I needed to make the most of my wall space because, frankly, that's all this eat-in kitchen had other than 3 upper and lower cabinets plus one drawer.  So I went to IKEA and bought myself a kitchen.  

Fortunately, they had a plethora of wall storage.  (Plethora- fun word, right?)  I grabbed a couple of these rods with these hooks and this basket.  And I really liked this spice rack, too.

I added a few other pieces like a hanging produce basket and a butcher's block where I keep my 'garage bin', a cloth basket full of tools, batteries, flashlights and other miscellaneous items.  All in all, I'm pretty happy with my kitchen space; it's functional and organized.  Just how I like it.


Tell me, Appleshiners, what tricks do you have for an organized kitchen?

Also, remember this loft kitchen that I unpacked and Appleshined?  I had cabinet envy soooo bad; look how well it turned out.

Tuesday, March 27, 2012

Shoe Hangers Without Shoes

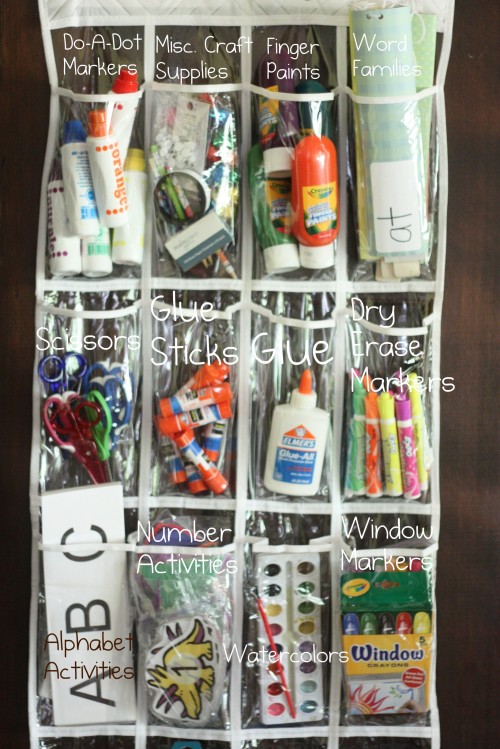
When organizing, I always talk about grouping 'like with like'.  Using bins, baskets, drawers or other receptacles are a great way to contain your materials but sometime it helps to be a bit more creative.

Here are a few ways to use shoe hangers for organizing things other than, well, shoes:


(Heather Weston)

And look at this great idea to use a shoe hanger as a planter.


Tell me, Appleshiners, how would you use a shoe hanger for something else?

Wednesday, March 14, 2012

Appleshine: Unpacking a Kitchen (Part 2)


In yesterday's post, I started unpacking my client's kitchen.  She'd just moved from her small apartment to a more spacious loft and had no idea how to layout her kitchen.  

I unpacked all her boxes, displaying her belongings on the floor so I could see all that I had to work with.  Taking into consideration the design of the kitchen, I approached the storage with a logical and realistic sense of efficiency.  Take a look at the before/after pictures:

While it was tempting to put food in the cabinet closest to the fridge, I appreciated the simplicity of being able to unload the dishwasher and put the dishware directly in the cabinets above.  If the plates had been over the sink instead (note the Before photo), it would've required reaching around an open cabinet door in order to put a clean dish away.  Eliminating extra steps like that keep a kitchen running efficiently.

Many of her appliances and gadgets were a bright cherry red.  Instead of hiding them in cabinets, I chose the most suitable ones to display on her countertop.  When placing such items, keep the paper towels close to the sink (preferably on the right side as most are right-handed), the cooking utensils by the stove and larger electrical items accessible to an outlet.

These are 4 of her...wait for it...8 drawers!!  I know that may not seem so impressive to anyone outside of NYC but most of us deal with only one kitchen drawer.  (I wish I were exaggerating but I swear I'm not!)  I'd already filled her 4 stacked drawers with utensils, gadgets, tupperware and linens (respectively).  And since these were on the extended side of her prep area, I used them for extra smaller items, keeping like with like.

While it would've been more logical to keep pots and pans in the inner cabinet, closer to the stove, the design didn't lend itself to that idea.  The inner cabinet had a deep pocket, causing the top shelf to cut back.  So I kept more of her prep items (strainers, mixing bowls, measuring cups) there instead.  Notice that when storing the pots and pans, I kept the lids on top.  Sometimes it helps save space if you turn the lids upside down, creating a smooth surface to stack other items on.  However, unless you have a lid rack in your kitchen, it always saves time having the matching lid at hand rather than searching through loose ones.


It was a long day but in the end, I had a LOT of fun unpacking this kitchen. Starting from scratch with any organization project is a great time to implement good systems that work with the design of the space as well as the functioning needs.


Tell me, Appleshiners, what tips do you have on determining a layout for your kitchen supplies?

PS- Here are some great kitchen organizing tips from real cooks- twitter style.

Tuesday, March 13, 2012

Appleshine: Unpacking a Kitchen (Part 1)


Last week, I helped a client unpack her kitchen.  Their move from a small apartment to a loft brought more cabinet space.  But thanks to their innovative storage in their previous apartment (she kept her baking supplies in the hall closet and the ice cream maker under their bed), they had more than enough cookware to fill it. 


The first step was to unpack everything.  Laying it all out in the open allowed me a visual survey of what I'd have work with.  


They'd already unpacked some of the basics (since they moved in a few days ago) yet had no ideas on where to place them.  


I peeked in all the cabinets, drawers and checked out the counter space, considering the most logical and efficient arrangement for their belongings.  They had a wide array of cookware, servingware, daily dishes, fine china, drinking glasses, wine glasses, linens- a full hostess' kitchen.

It was a long day of Appleshining but if you check back tomorrow, I'll show you how it ended up!


Tell me, Appleshiners, do you have any tips for unpacking a kitchen?
Related Posts Plugin for WordPress, Blogger...