Showing posts with label Loft. Show all posts

Friday, April 13, 2012

Architectural Digest Home Design Show

Recently, I visited the Architectural Digest Home Design Show, not just to look around but also to support my very talented friend, Dwayne, and his gorgeous interior design firm, RDYC.  He was selected by DIFFA for their Dining by Design exhibit- congrats!

It was fun afternoon (especially since it was particularly cold and rainy outside) and I wandered about, finding plenty of organization inspiration and snapping a few photos along the way.

Of course California Closets had an enviable closet display.  I really like the natural, wooden shelving with glass shelving and cabinets- it's so light and airy.  I could totally see myself getting ready in that closet.

I like these little stools.  The soft colors are so pretty and they could double for an end table or extra seating.  Multi-tasking furniture is key for small space organization.

How gorgeous is this shelving unit?!  My taste usually doesn't go towards earthy elements but the simple beauty of this piece is stunning.  And the height allows for more shelves = more organizing solutions.

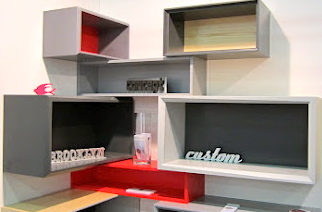
Shadow box shelving units are all over the place but I've never seen them assembled like this before!  They made the most of a corner space, taking storage vertical and maximizing wall space.
Remember my post on using a frame to hold sunglasses?  This company has a streamlined version of that concept.  Board by Design makes an iWear Rack so compact and attractive, you could place it right by your front door and never forget your sunglasses again.

I had a lot of fun with this little weekend activity.  


Tell me, Appleshiners, what are you up to this weekend?

Friday, April 6, 2012

Cool Furniture for Small Spaces


Look at me, hanging out on that cool couch....that turns into a bed!  It's my dream come true: the ultimate space saver that's both practical and trendy.  

In the past, this type of bed was a dark and dowdy contraption (with a name that rhymed with 'urphy').  Nowadays, Resource Furniture has transformed the hideaway bed into a modern living room layout.  And they didn't stop there; they have console tables that stretch to seat 14 people, bunk beds that double as an office and coffee tables that triple as a desk for one or formal seating for 10.  

I was so excited to go to their event this week and take a grand tour of the showroom.  My most favorite piece was their beautiful sofa which happened to turn into a bed.  Fantastic!

First, you have to remove the many throw pillows (their fabric selection is gorgeous and plentiful).  And note the ample storage space underneath the couch.  Very cool.


Then simply pull the shelf down to open up the bed.  It acts as the support for the frame and the best part is, nothing on the shelf gets disturbed.  Even those glass vases remain untouched when the bed is fully functional.


And there you have it!  One, two, three steps from a cushy sofa to a snuggly sleeping arrangement.  It's a Queen size bed, too, and I swear that mattress is more comfy than the one at my apartment.  (Or maybe I was just giddy from the demonstration.) 


Regardless, it's a great way to save space in a small apartment, guest room or vacation home.  And it's sleek, efficient and easy on the eyes. I had such a lovely time at their event and can't wait to see what design they'll come up with next.


Tell me, Appleshiners, where would you use a bed like this?


PS- I hope everyone has a happy holiday!  If you're planning on joining family and friends for a yummy dinner, use these great carriers to get your food there unharmed and in style.

If you're hosting a get together, here are a few ideas for extra seating in a small space.

If your list of things to do is overwhelming, take a few deep breaths and follow these tips on how to make the most of your time.

And, most of all, I hope you have as much carefree fun as she does here.  Happy weekend, everyone!

Wednesday, March 14, 2012

Appleshine: Unpacking a Kitchen (Part 2)


In yesterday's post, I started unpacking my client's kitchen.  She'd just moved from her small apartment to a more spacious loft and had no idea how to layout her kitchen.  

I unpacked all her boxes, displaying her belongings on the floor so I could see all that I had to work with.  Taking into consideration the design of the kitchen, I approached the storage with a logical and realistic sense of efficiency.  Take a look at the before/after pictures:

While it was tempting to put food in the cabinet closest to the fridge, I appreciated the simplicity of being able to unload the dishwasher and put the dishware directly in the cabinets above.  If the plates had been over the sink instead (note the Before photo), it would've required reaching around an open cabinet door in order to put a clean dish away.  Eliminating extra steps like that keep a kitchen running efficiently.

Many of her appliances and gadgets were a bright cherry red.  Instead of hiding them in cabinets, I chose the most suitable ones to display on her countertop.  When placing such items, keep the paper towels close to the sink (preferably on the right side as most are right-handed), the cooking utensils by the stove and larger electrical items accessible to an outlet.

These are 4 of her...wait for it...8 drawers!!  I know that may not seem so impressive to anyone outside of NYC but most of us deal with only one kitchen drawer.  (I wish I were exaggerating but I swear I'm not!)  I'd already filled her 4 stacked drawers with utensils, gadgets, tupperware and linens (respectively).  And since these were on the extended side of her prep area, I used them for extra smaller items, keeping like with like.

While it would've been more logical to keep pots and pans in the inner cabinet, closer to the stove, the design didn't lend itself to that idea.  The inner cabinet had a deep pocket, causing the top shelf to cut back.  So I kept more of her prep items (strainers, mixing bowls, measuring cups) there instead.  Notice that when storing the pots and pans, I kept the lids on top.  Sometimes it helps save space if you turn the lids upside down, creating a smooth surface to stack other items on.  However, unless you have a lid rack in your kitchen, it always saves time having the matching lid at hand rather than searching through loose ones.


It was a long day but in the end, I had a LOT of fun unpacking this kitchen. Starting from scratch with any organization project is a great time to implement good systems that work with the design of the space as well as the functioning needs.


Tell me, Appleshiners, what tips do you have on determining a layout for your kitchen supplies?

PS- Here are some great kitchen organizing tips from real cooks- twitter style.

Tuesday, March 13, 2012

Appleshine: Unpacking a Kitchen (Part 1)


Last week, I helped a client unpack her kitchen.  Their move from a small apartment to a loft brought more cabinet space.  But thanks to their innovative storage in their previous apartment (she kept her baking supplies in the hall closet and the ice cream maker under their bed), they had more than enough cookware to fill it. 


The first step was to unpack everything.  Laying it all out in the open allowed me a visual survey of what I'd have work with.  


They'd already unpacked some of the basics (since they moved in a few days ago) yet had no ideas on where to place them.  


I peeked in all the cabinets, drawers and checked out the counter space, considering the most logical and efficient arrangement for their belongings.  They had a wide array of cookware, servingware, daily dishes, fine china, drinking glasses, wine glasses, linens- a full hostess' kitchen.

It was a long day of Appleshining but if you check back tomorrow, I'll show you how it ended up!


Tell me, Appleshiners, do you have any tips for unpacking a kitchen?
Related Posts Plugin for WordPress, Blogger...