Showing posts with label Organized Kitchen Pantry. Show all posts

Friday, July 6, 2012

My IKEA Kitchen


When I moved into my apartment (7 years ago!), I immediately got to work on kitchen solutions.  I knew I needed to make the most of my wall space because, frankly, that's all this eat-in kitchen had other than 3 upper and lower cabinets plus one drawer.  So I went to IKEA and bought myself a kitchen.  

Fortunately, they had a plethora of wall storage.  (Plethora- fun word, right?)  I grabbed a couple of these rods with these hooks and this basket.  And I really liked this spice rack, too.

I added a few other pieces like a hanging produce basket and a butcher's block where I keep my 'garage bin', a cloth basket full of tools, batteries, flashlights and other miscellaneous items.  All in all, I'm pretty happy with my kitchen space; it's functional and organized.  Just how I like it.


Tell me, Appleshiners, what tricks do you have for an organized kitchen?

Also, remember this loft kitchen that I unpacked and Appleshined?  I had cabinet envy soooo bad; look how well it turned out.

Monday, April 2, 2012

How to Organize a Refrigerator


Happy Monday!  It's a new week with a new list of things to do...like spring cleaning.  Growing up, my mom always enlisted my brother and me to help with the cleaning.  And keeping us occupied long enough for her to scrub down the fridge was probably one of many perks to family cleaning. 

Mom kept a clean and organized fridge.  And I've kept those traits alive from my first mini-fridge in college to my fridge-for-one on the Upper East Side.  Wiping it down every few months seems worth it; it just makes sense to keep your food in a clean space.  My flair for organizing the items within might be a little much, though.  My friend once asked, 'why do you keep the food stocked like it's at a grocery store?'  I guess I kinda view it that way: labels out, produce in the drawers, condiments in the side, butter up top.  Makes me feel like opening the fridge is a little grocery run.


Shopping in bulk is cost effective, especially for a family, but often times loose food gets lost at the back of the fridge.  These containers allow you to keep like with like, as well as adding an extra drawer element, enabling you to see what's shoved away.


I like this idea of labeling the drawers and shelves.  In a way, it guides you to what you're looking for, or should be looking for, when you take a sneak peak for a snack.  Often times, I open the fridge without much thought for what I'm looking for.  I think labels would direct me to healthy energy options and keep me away from the easy carb choices.


My biggest organizing tip for a refrigerator is utilizing the given compartments for their intended use: produce in the bottom drawers, condiments on the door shelves, butter in the top, protein and cheese in the small, mid-section drawer and sodas in the hanging rack.  The structure of the fridge already lends itself to organization if following properly.  But if you need some more ideas, or extra receptacles, check out this list of tips and ideas.

And if you're prepared for a full fridge makeover, follow this step-by-step How To on cleaning your fridge before you attempt to get organized.


Tell me, Appleshiners, how do you keep your fridge organized?

Tuesday, March 27, 2012

Shoe Hangers Without Shoes

When organizing, I always talk about grouping 'like with like'.  Using bins, baskets, drawers or other receptacles are a great way to contain your materials but sometime it helps to be a bit more creative.

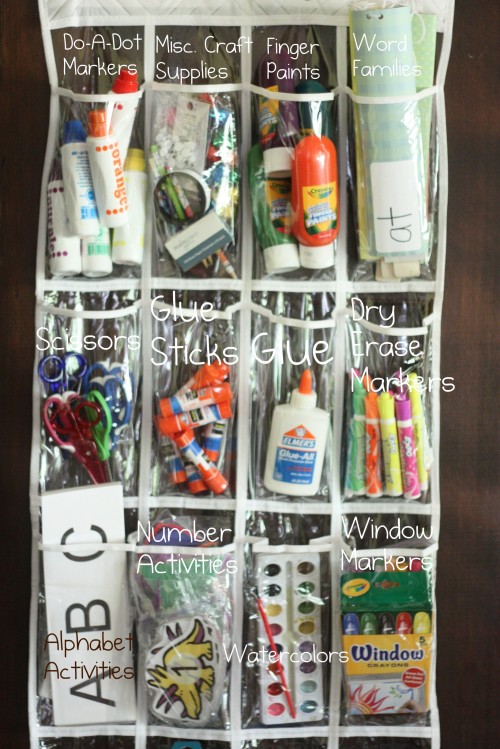
Here are a few ways to use shoe hangers for organizing things other than, well, shoes:


(Heather Weston)

And look at this great idea to use a shoe hanger as a planter.


Tell me, Appleshiners, how would you use a shoe hanger for something else?

Wednesday, March 21, 2012

Organization Inspiration


Being from the South, I have a deep rooted love of glass jars.  My grandma used to can veggies and preserves from her garden and I remember the endless shelves of Mason jars in her basement.  Nowadays, in an effort to repurpose old materials, glass jars can reinvent themselves into useful ways to stay organized.  Take a look:

A salad in a jar! Pour in the dressing and shake...so easy.  You can use the jars for other kinds of snacks, too.  It's great for a picnic or packing a lunch.

Create more storage space by clearing off your counter top.  Mount a magnetic strip underneath your cabinets to hold smaller, matching jars for your spices.

Glass jars shouldn't be limited to just your spices (or canned preserves).  This Appleshine client used glass jars for all her pantry staples.

Oooh, look-y here, crafters!  Keep your yarn bottled up and manageable by poking a hole in the tops of the jars.  This could work for wrapping ribbons, twine or other spools of materials.

Use chalkboard labels to keep your desk, playroom or kitchen closet organized and all the items in their place.

Haha!  These photo frames made me smile.  You could also stand the jar upright and fill it with olive oil to give your picture a sepia effect like this.

Oh, so many ways for glass jars to help organize your lifestyle.  And if those weren't enough, check out these other fun ideas, too.


Tell me, Appleshiners, how do you repurpose old jars for new organization?

Tuesday, March 20, 2012

Grab a Towel


Making messes is a part of life.  So grab a towel, wipe it up and keep on moving.

My friend, Landis, has accomplished the ginormous task of living this past year entirely without paper towels.  She used a variety of dish towels to wipe up her small messes; this and this were her favorite and most effective towels.  Check out her great tips on how she made it work.

I, on the other hand, while not completely banishing Bounty from my life, have made an effort to cut back on the paper products.  I don't have a washer/dryer in my small, pre-war apartment so keeping up with the wash is a little difficult.  Instead, I limit my paper towel use to cleaning dirt or sticky messes and use the washable towels for spills that can easily be wiped up.

I'm not sure I could quit 'cold turkey' for a whole year but I'll admit- no more paper towels would, in turn, eliminate some paper waste.  And I'm all about cutting down on waste.

Tell me, Appleshiners, could you make it a whole year without paper towels?

Thursday, March 15, 2012

Good Finds

Oh, the weather in NYC is just gorgeous!!  I've been soaking up some springtime sun this week with a few afternoon walks.  Yesterday, I wandered into Gracious Home, a New-Yorker's staple for home furnishings.  I did some snooping for good Appleshine recommendations and here are a few products I really liked:

A folding colander from Joseph Joseph.  It deconstructs to lie flat while stored in a cabinet.  The entire line features ergonomic designs; helpful space savers for apartment living.  I like this cutting board and salad bowl (with serving utensils build into the bowl!)

I was just wishing for these!  Shelf dividers are great for adding more structure to cabinet shelves, especially when you're renting and can't make permanent changes.  You can find them here since they aren't listed on the website.

Why don't you toss your old stand-up towel holder and use this one instead?  Hanging your towels from underneath your cabinet saves counter space.

It was a fun little outing...warm weather, sunshine and organizing.  If only I could find a way to do all that at the beach, it'd be my nirvana ;)  


Tell me, Appleshiners, what good finds have you seen lately?

Wednesday, March 14, 2012

Appleshine: Unpacking a Kitchen (Part 2)


In yesterday's post, I started unpacking my client's kitchen.  She'd just moved from her small apartment to a more spacious loft and had no idea how to layout her kitchen.  

I unpacked all her boxes, displaying her belongings on the floor so I could see all that I had to work with.  Taking into consideration the design of the kitchen, I approached the storage with a logical and realistic sense of efficiency.  Take a look at the before/after pictures:

While it was tempting to put food in the cabinet closest to the fridge, I appreciated the simplicity of being able to unload the dishwasher and put the dishware directly in the cabinets above.  If the plates had been over the sink instead (note the Before photo), it would've required reaching around an open cabinet door in order to put a clean dish away.  Eliminating extra steps like that keep a kitchen running efficiently.

Many of her appliances and gadgets were a bright cherry red.  Instead of hiding them in cabinets, I chose the most suitable ones to display on her countertop.  When placing such items, keep the paper towels close to the sink (preferably on the right side as most are right-handed), the cooking utensils by the stove and larger electrical items accessible to an outlet.

These are 4 of her...wait for it...8 drawers!!  I know that may not seem so impressive to anyone outside of NYC but most of us deal with only one kitchen drawer.  (I wish I were exaggerating but I swear I'm not!)  I'd already filled her 4 stacked drawers with utensils, gadgets, tupperware and linens (respectively).  And since these were on the extended side of her prep area, I used them for extra smaller items, keeping like with like.

While it would've been more logical to keep pots and pans in the inner cabinet, closer to the stove, the design didn't lend itself to that idea.  The inner cabinet had a deep pocket, causing the top shelf to cut back.  So I kept more of her prep items (strainers, mixing bowls, measuring cups) there instead.  Notice that when storing the pots and pans, I kept the lids on top.  Sometimes it helps save space if you turn the lids upside down, creating a smooth surface to stack other items on.  However, unless you have a lid rack in your kitchen, it always saves time having the matching lid at hand rather than searching through loose ones.


It was a long day but in the end, I had a LOT of fun unpacking this kitchen. Starting from scratch with any organization project is a great time to implement good systems that work with the design of the space as well as the functioning needs.


Tell me, Appleshiners, what tips do you have on determining a layout for your kitchen supplies?

PS- Here are some great kitchen organizing tips from real cooks- twitter style.

Tuesday, March 13, 2012

Appleshine: Unpacking a Kitchen (Part 1)


Last week, I helped a client unpack her kitchen.  Their move from a small apartment to a loft brought more cabinet space.  But thanks to their innovative storage in their previous apartment (she kept her baking supplies in the hall closet and the ice cream maker under their bed), they had more than enough cookware to fill it. 


The first step was to unpack everything.  Laying it all out in the open allowed me a visual survey of what I'd have work with.  


They'd already unpacked some of the basics (since they moved in a few days ago) yet had no ideas on where to place them.  


I peeked in all the cabinets, drawers and checked out the counter space, considering the most logical and efficient arrangement for their belongings.  They had a wide array of cookware, servingware, daily dishes, fine china, drinking glasses, wine glasses, linens- a full hostess' kitchen.

It was a long day of Appleshining but if you check back tomorrow, I'll show you how it ended up!


Tell me, Appleshiners, do you have any tips for unpacking a kitchen?

Thursday, March 8, 2012

Appleshine: Nashville Pantry


Most southern kitchens have the luxury of cabinets, drawers and closets- all hard to come by in a small NYC apartment (like mine!)  True to it's intention, this Nashville pantry should only hold food and drink items (with the occasional servingware exception).


First, I removed materials that were meant to live outside the pantry (charcoal to the garage, deep fryer in the cabinet, etc).  Then I took all the items off the shelves and grouped them into categories.  When putting them back up, keep like items together (condiments, dressing+marinades, canned goods, baking supplies and so on).  Place the categories according to frequency of use.  Your everyday goods like canned veggies and soups should be at eye-level while larger, less-frequently used items like flour and sugar should be down low.  Save the higher shelves for special occasion items and servingware.


Tell me, Appleshiners, how do you organize your pantry?


PS- A great cheat sheet on how to keep your pantry clean and functional for your family.

A list of 10 must-have pantry staples.

Know the life of a spice.

Pantry art- I love this one (but not this one because I hate, hate, hate pickles!  I'd write 'cherry pie' instead.)
Related Posts Plugin for WordPress, Blogger...